Updated on 2/18/08
– For the latest, see the Red Rover Wiki Adoption page here**.
———————————–
This blog is a quick ‘How To‘ for the first round pilot schools (there are 15 of you!) for setting up Red Rover.
There are five main steps in the process:
1) Signing up yourself as the admin (meaning the person capable of editing Red Rover for your school). (ten minutes)
2) Finalizing the group categories. (five minutes, plus thinking time if necessary.)
3) Uploading the list of groups, group leaders, and advisors with e-mails. (Gathering time, plus 1 minute to e-mail it to us.)
4) Getting Student Leaders and advisors to set up their groups. (20 minutes, one day. 10-minute follow-up two days later. 10-minute follow-up three days later. 30 minutes chasing the 5-10% slackers over the next week and checking groups.)
5) Getting students to fill out the Red Rover profile. (30 minutes.)
Here are the details for each step:
Step 1: Admin Sign Up
You will receive an invitation e-mail from us. (Check your junk mail folder if you don’t see it in your inbox.)
If you can’t find the invite e-mail, you can simply sign up yourself up as a normal user, and then we will upgrade you to admin status. You would do this from your school’s Red Rover home page.
You can find your school’s home page and login by using your school’s website address and adding “redroverhq.com” to the end. For example, Juniata College’s web address is http://www.juniata.edu, so their Red Rover web address is http://juniata.redroverhq.com
If your school is part of a network of schools, i.e. CUNY or SUNY, and your web address is something like http://qc.cuny.edu, then you would drop the extra period and your Red Rover web address would be http://qccuny.redroverhq.com. You’ll know you are in the right place because you will see the correct full school name at the top of the page. If you don’t see the correct school name at your web address, send us an e-mail and we will fix it for you.
After you are finished filling out your personal profile, e-mail us and we will upgrade your account to admin status.
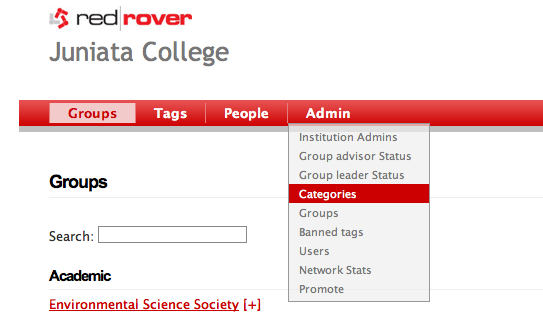
Step 2: Setting Up Group Categories
You will find this step either in the admin sign-up wizard (if you are invited as the admin) or, if you sign up as staff and get upgraded, you will find it under the admin tab in your navigation. Just click on the “admin” tab, and then “categories”:

The importance of this step is proportional to the number of groups you have. If you have under 40, it’s not that big a deal to change it later. If you have over 500 it will be a pain, so put some thought into it.
Red Rover starts out with a default category list and you can add or delete categories as you wish. We recommend keeping it to no more than 10 categories, otherwise, it will be annoying for students to sift through.
Step 3: Uploading your groups
Just download this template excel doc and match your school’s group information to the column headers.
Two important points:
1) To add a group it must have at the minimum an advisor name and email.
2) Keep the excel doc headers exactly as they are, don’t move them or the file will not upload correctly.
After you are finished, e-mail the excel document to us and we’ll upload it and let you know when it is ready. Should be quick.
Step 4: Getting Student Leaders and Advisors to set up their groups
The goal of this step is to get all the student leaders and advisors to fill out a profile for themselves and set up their group.
They just need a link to your school’s Red Rover sign-up page and sign up. This page is at your main web address, i.e. http://uga.redroverhq.com.
To help you accomplish this, Red Rover provides an invite tool.
Red Rover can either send an invite e-mail to all of the Student Leaders with one click or, if you prefer you can invite them one at a time.
To invite them all at once roll over the “Admin” section and select “Group Leader Status”:

Then click the “send to all” button.
The same process can be repeated for the group Advisors by navigating to “Group advisor Status” under the Admin tab.

To send an invite to the student leaders one at a time, just click the mail icon next to their name.
We recommend also putting your school’s Red Rover web address on the school leader Facebook groups or e-mailing it out separately on your own. Sign up rates will go up when students see the link in multiple places.
Also, every time a leader signs up for Red Rover and installs the Facebook application, their friends will be notified and this will create sign ups as well.
You can check a group’s sign up status by clicking on “Groups” under the “Admin” section. Groups that are filled out will be under “Active” and the groups still unfinished will be under “Inactive”.
It is best to wait to move on to the next step until all or almost all of your groups are in the “Active” section of groups.
Step 5: Getting Students to fill out a Red Rover profile
The goal of this step is similar to step 4 – get the Red Rover sign up page in front of students – this time, it just applies to all the students.
There are many strategies for this and it is up to you and your creativity to decide what is best for your school. Some ideas just to get you started:
1) Look for the freshman class Facebook group. There is almost always one if not more. Search for your school name with a year. i.e. “Kutztown 2011” brings up http://www.facebook.com/group.php?gid=2242708647 and has 749 members. This is 70% of the entire freshman class. You could either leave the Red Rover link in the comments section, or contact the group’s admin and ask them to e-mail out the link. (Facebook Group admins can e-mail the whole group at once.)
2) Put the link on your activities web page.
3) Ask the student leaders to spread the link within Facebook or Myspace.
4) Put up posters in the computer labs or student union with the link (anywhere student’s hang out and use computers.)
Keep in mind that all of student’s friends will be notified when they install the application from within Facebook. If you can get 20% of the students to sign up, it should spread out from there because it will become the thing to do in Facebook.
At any time, you can check your school’s sign up statistics by clicking on “network stats” under the “Admin” section.
We know you will come up with all kinds of new solutions to these steps. That’s the fun of the pilot program – leave us some comments here or send and e-mail, we want to hear your thoughts.
